Newsletter Subscribe
Enter your email address below and subscribe to our newsletter

Enter your email address below and subscribe to our newsletter

Face swapping has become a popular technique in media, allowing for creative and sometimes humorous edits. Whether you’re looking to create a fun meme or work on a professional project, face swapping can add a unique touch to your content. In this article, we’ll explore how to swap faces using Adobe tools like Photoshop and Premiere Pro, as well as the AI-powered iFoto Face Swap for video. Let’s dive in and discover how you can achieve seamless face swaps!
Adobe Photoshop and Premiere Pro are industry-standard tools for photo and video editing. Photoshop is renowned for its powerful image manipulation capabilities, while Premiere Pro is a go-to for professional video editing. Both tools offer extensive features that make face swapping a breeze.
Key Features for Face Swapping in Adobe Photoshop and Premiere Pro

1. Open Both Images: Open the images in Photoshop. Arrange them side by side.
2. Select the Face: Use the Lasso Tool (L) to carefully trace around the face you want to swap.

3. Copy and Paste: Press Ctrl+C (Cmd+C on Mac) to copy the selection, then Ctrl+V (Cmd+V on Mac) to paste it onto the destination image.
4. Transform the Face: Use the Transform Tool (Ctrl+T/Cmd+T) to resize and position the face. Hold Shift while resizing to maintain proportions.
5. Blend the Edges: Use the Eraser Tool (E) with a soft brush to blend the edges. Adjust opacity for smoother blending.
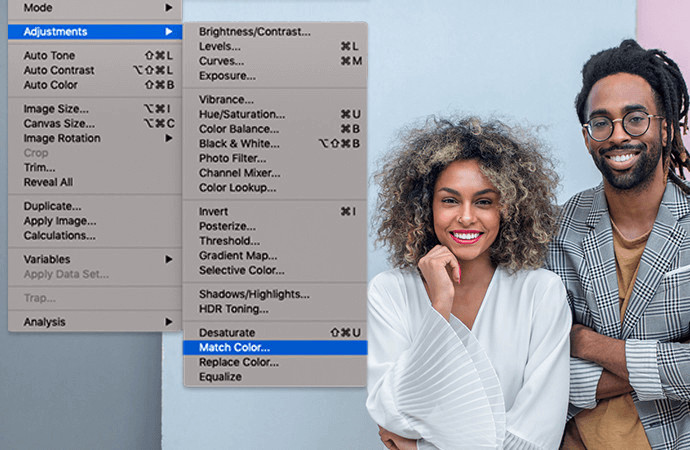
6. Match the Colors: Go to Image > Adjustments > Match Color. Adjust settings to blend skin tones.

7. Refine Details: Use the Clone Stamp Tool (S) to refine textures and details for a natural look.
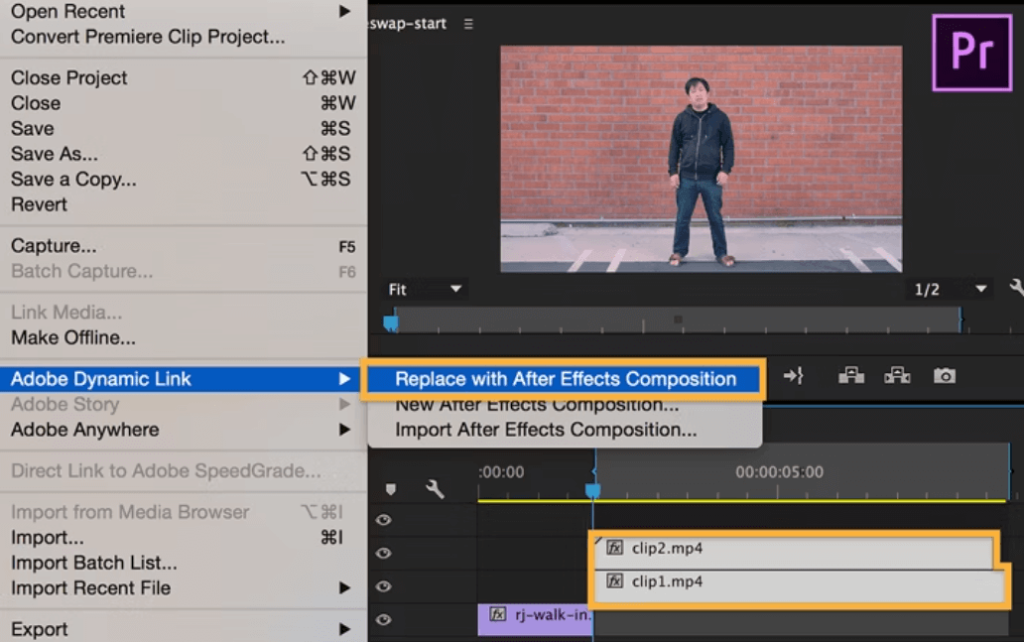
1. mport Videos: Import the video clips into Premiere Pro.
2. Create a Mask: Use the masking tool to outline the face you want to swap. This creates a mask around the face.
3. Track the Mask: Use the tracking feature to follow the face throughout the video. This ensures the mask stays on the face.

4. Overlay the New Face: Import the new face as a separate layer. Position it over the original face using the mask as a guide.
5. Adjust the Mask and Face: Refine the mask and face positioning to ensure a natural fit.
6. Blend Edges: Use feathering to blend the edges of the new face with the video.
7. Color Correct: Use adjustment layers to match the skin tones and lighting between the two faces.
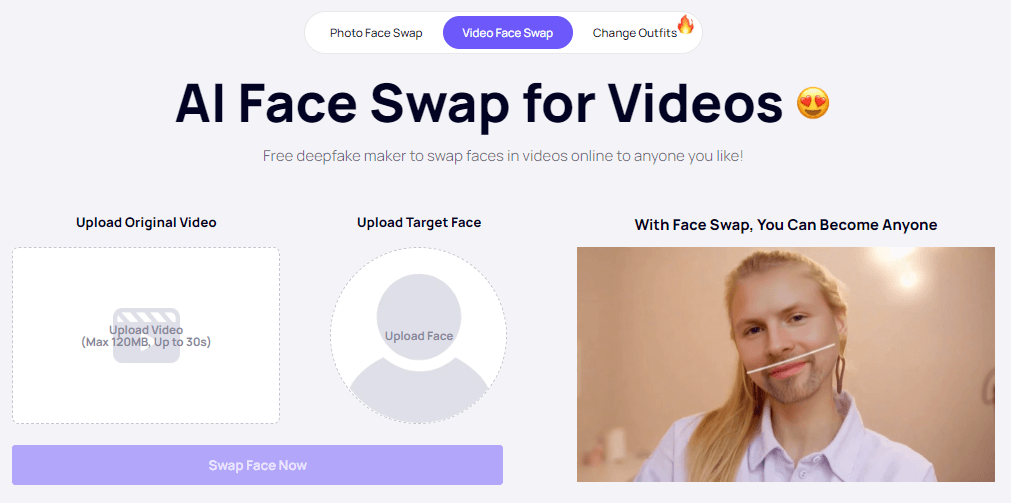
iFoto Face Swap is designed for easy and realistic face swapping in videos. It leverages advanced algorithms to ensure seamless swaps, making it a great alternative to Adobe for those who prefer a more automated approach.
Key Features:

1. Upload Your Video: Import the video you want to edit into iFoto Face Swap.
2. Select Faces: The AI tool will automatically detect and select faces in the video.
3. Choose the New Face: Upload the image or video of the new face you want to use.
4. Apply the Face Swap: Use the AI tool to apply the face swap. The software will automatically adjust and blend the new face into the video.
5. Refine the Swap: Make any necessary adjustments to ensure a natural look. This includes tweaking the position, size, and blending.
6. Preview and Export: Preview the face swap in real-time. Once satisfied, export the video in your desired format.

Comparing Adobe and iFoto Face Swap
| Feature | Adobe Photoshop | Adobe Premiere Pro | iFoto Face Swap |
| Purpose | Image editing and manipulation | Video editing and effects | Video face swapping using AI |
| User Interface | Advanced, professional-level, steep learning curve | Advanced, professional-level, steep learning curve | User-friendly, intuitive, suitable for beginners |
| Face Swapping Tools | Lasso Tool, Transform Tool, Eraser Tool, Clone Stamp Tool | Masking, Tracking, Adjustment Layers | AI Face Recognition, Real-time Editing |
| Customization | Highly customizable | Highly customizable | Limited customization compared to Adobe |
| Ease of Use | Requires experience and training | Requires experience and training | Easy to use, minimal learning curve |
| Precision and Control | High, allows detailed control over edits | High, allows detailed control over edits | Moderate, relies on AI for precision |
| Automation | Manual processes | Manual processes | Automated AI-driven processes |
| Real-time Editing | Not typically real-time | Limited real-time editing capabilities | Real-time preview and editing |
| Required Skill Level | Intermediate to advanced | Intermediate to advanced | Beginner to intermediate |
| Time Investment | Time-consuming for detailed swaps | Time-consuming for detailed swaps | Quick, due to AI automation |
| Platform Availability | Desktop (Windows, Mac) | Desktop (Windows, Mac) | Desktop and mobile (iOS, Android) |
| Cost | Subscription-based (Adobe Creative Cloud) | Subscription-based (Adobe Creative Cloud) | Free version available, premium features may cost extra |
| Use Case Scenarios | Professional photo manipulation, graphic design | Professional video editing, special effects | Quick and easy face swapping in videos |
| Output Quality | High, professional-grade | High, professional-grade | High, dependent on AI algorithms |
Conclusion
Face swapping in Adobe and iFoto Face Swap opens up a world of creative possibilities. Whether you prefer the detailed control of Adobe tools or the simplicity of iFoto AI-powered solution, you can achieve professional-looking results with practice and attention to detail. Don’t be afraid to experiment and refine your skills!
It depends on your skill level and the complexity of the project. On average, it can take anywhere from 15 minutes to an hour in Adobe, while iFoto can achieve results in seconds due to its automated process.
Yes, iFoto Face Swap is available on both desktop and mobile platforms, making it convenient to use on the go.
Pay attention to lighting, angles, and skin tones. Use blending tools and color matching features to ensure a seamless look.
It depends on the context and usage. For personal use, it’s generally fine. However, for commercial purposes, you may need permission from the individuals involved.